Revit Trim Wall To The Slope Of A Roof

Slope Wall Attach To Roof Autodesk Community

Slop Bottom Of Wall Autodesk Community Revit Products

Revit Tips Spanish Roof Adaptive Insane Version Revit Tutorial Autocad Revit Roof
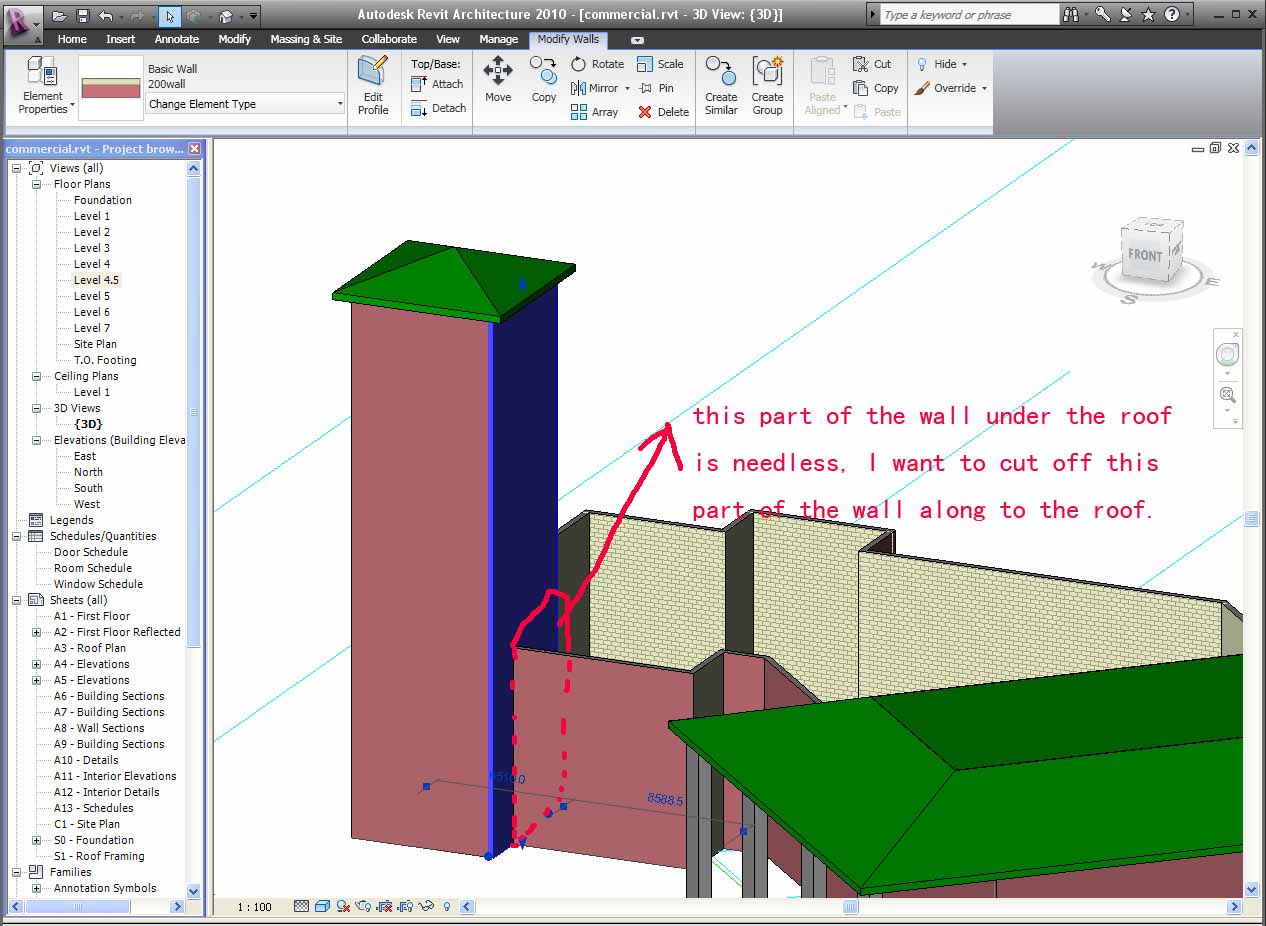
Revitcity Com How To Cut The Wall Along The Roof

Revit Roof Basics 10 Slope Arrow Cadclips Youtube

Struggling To Create The Perfect Roof This Guide Will Teach You How To Control Roof Slope How To Create A Dormer And Many More Eff Roof Repair Roofing Roof

Sketch slope arrows as shown.
Revit trim wall to the slope of a roof.

How To Modify The Side Contour Of A Wall Architecture Program New Surface Roof Beam

Trapezoidal Wall Cladding Wall Cladding Cladding Revit Architecture

Revit Conceputal Massing 04 Wall Roof By Face Revit Tutorial Autodesk Revit Mass

Pin On Tips Tricks In Revit

33 Luxury Garden Roof Plan Revit Revitcity In 2020 Roof Plan Luxury Garden Roof Design

Modeling A Tensile Fabric Roof In Revit Building Information Modeling Architecture Program Revit Architecture
Parapet 0033441 Png 420 386 Detalles Constructivos Planos Arquitectonicos Arquitectura

Shingle Flare Detail Jarvis Architects Architecture Details Revit Architecture Barn Style House

Assignment 4 Center Square Curtain Walls I Revit Architecture With Images Revit Architecture Architecture Curtain Wall

Rafter Framing W Autodesk Revit Extensions Autodesk Revit Revit Architecture Revit Tutorial

Autodesk Revit Tutorials 05 Adding The Roof Revit Tutorial Autodesk Revit Revit Architecture

Creating Walls That Follow Site Topography Contours In Revit Revit Tutorial Topography Site

Revit Architecture 2011 Beginners Tutorial 4 Windows Doors Wall Assembly Via Youtube Revit Architecture Revit Tutorial Architecture

The Cantilevered Mini Parapet Notice That Air Control Layer Continuity Is Achieved By Wrapping The Membrane Over The Buildi Parapet Roof Construction Roof Edge

Revit Architecture Roof By Footprint Bimscape Roofing Fibreglass Roof Roof Design

Pin By Mickoloy Wellington On Architectural Detail Roof Structure Architecture Details Parapet

Trim Wall Top With Ref Plane Autodesk Community Revit Products

Trim Interscting Roofs Autodesk Community Revit Products
Https Encrypted Tbn0 Gstatic Com Images Q Tbn 3aand9gcrkfytjc8fjja1 5uxwox2vqlsxol0q0ngx5xw2dyi94td Ucqh Usqp Cau

Autodesk Revit Structural Detailing 2019 Tutorial Modern Architecture Interior Revit Architecture Modern Architecture

Curtain Wall Mullions And Join Conditions Revit Architecture Revit Architecture Architecture Curtain Wall

Love This Guys Work Think We Need To Hire Him To Do Conceptual Drawings Roof Truss Design Roof Design Roof Framing

Revit Architecture Creating Roofs And Floors Lesson 2 Revit Architecture Revit Tutorial Roof Shapes

Revit Tutorial Understanding Your Roof Eaves Soffits Therevitkid Com Tutorials Tips Products And Information On All Revit Tutorial Roof Eaves Roof
Source : pinterest.com
