Revit Offset From Roof Base

Solved Roof Eaves Will Not Offset Autodesk Community Revit Products

Revit Tips Plate Offset From Base Roof Youtube
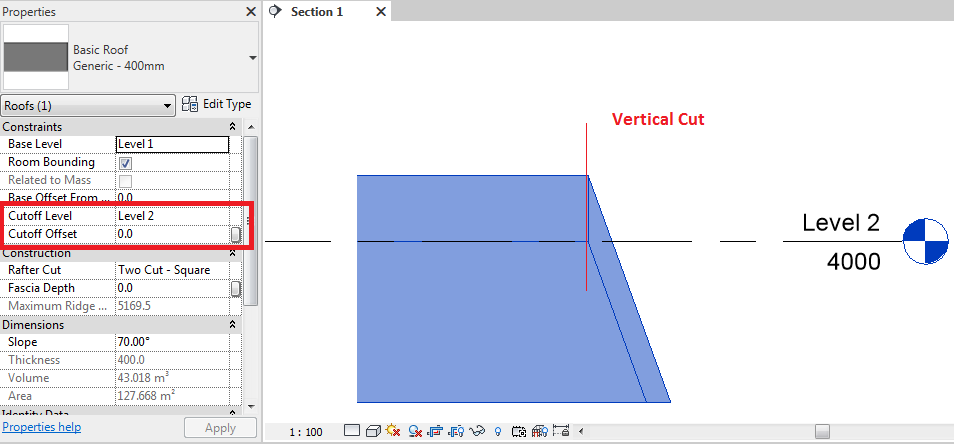
Cutoff Level Roof Behavior In Revit Revit Products 2018 Autodesk Knowledge Network

Webinar 2 Creating Masses In Revit Youtube Archdesignlabs Revit Tutorial Autodesk Revit Mass

Plate Offset From Base Setting Autodesk Community Revit Products

Revit 2019 Offset Clerestory Roof Youtube

For example in the following section view.
Revit offset from roof base.

The Difficulties Of Ramps Ramp Phrase Difficulties

Roof Overhang Problem Autodesk Community Revit Products

Solved Roof Level Overhang Autodesk Community Revit Products

Roof Base Offset And Pitch Difference Autodesk Community Revit Products

16 Creating Complex Roof In Revit Architecture Hip Roofs Youtube Revit Architecture Hip Roof Architecture

Create Parts From Roof Bug Autodesk Community Revit Products

Solved Roof Is Drawn Higher Than Level Placed At Autodesk Community Revit Products

Questions In Revit Follow The Process Augi This Or That Questions Revit Software Process

Revit Architecture An Introduction To Revit Walls Bimscape Revit Architecture Architecture Wall

Revitcat Revit Multistorey Stairs Method 1 Method Stairs Bim

Autodesk Revit An Introduction To Repeating Details Autodesk Revit Revit Tutorial Autodesk

76 Autodesk Revit Tips And Shortcuts By Viatechnik Autodesk Revit Revit Tutorial Building Information Modeling

Solved Roof By Footprint With Variable Plate Heights Autodesk Community Revit Products

Print Hidden Line Vectorized Revit Architecture Print Floor Plans

Ghim Tren Vẽ Mai Trong Phần Mềm Revit

Tutorial Conceptual Massing And Revit Structure 2014 Conceptual Tutorial Illuminati

Solved Roof Structure Autodesk Community Revit Products

Pin On Building

Using Autocad P Id And Revit Mep For Piping Design Piping Design Autocad Tool Design

Full Project Using Revit Structure 1 Civil Engineering Community Civil Engineering Software Civil Engineering Engineering

Solved Room S Lower Offset Is Above The Computation Height Autodesk Community Revit Products

Model Your Revit Designs In The Context Of The Real World In This Webinar Lumion Expert Chris Welton Shows H Video Revit Tutorial Revit Architecture Architecture

Change The Room Height Graphically Revit Products 2016 Autodesk Knowledge Network

Wall Heights Will Not Change Autodesk Community Revit Products
Source : pinterest.com
